


Troubleshooting DTF Printhead Clogs: Step-by-Step Guide

Table of Contents
- Understanding DTF Printhead Clogs: Causes and Symptoms
- How to Perform a Nozzle Check on Your DTF Printer
- Manual Cleaning Process for DTF Printhead Clogs
- Preventing White Ink Clogging in DTF Printers
- DTF Printer Maintenance Schedule to Avoid Clogs
- When to Replace Your Printhead Versus Repair
- Common Mistakes to Avoid When Cleaning Printheads
- Conclusion
Last Updated: August 20, 2026
Understanding DTF Printhead Clogs: Causes and Symptoms
DTF printhead clogs are one of the most common challenges in direct-to-film printing. When ink pathways become blocked, print quality deteriorates rapidly and production timelines suffer. Understanding the causes and recognising early symptoms is essential for effective troubleshooting.
A clogged printhead occurs when ink fails to flow properly through the nozzles, resulting in gaps, streaks, or missing colours in your prints. DTF systems use water-based and solvent-based inks that behave differently under various conditions. White ink, in particular, tends to settle and thicken over time, creating viscosity issues that block nozzle passages.
Common causes of printhead clogs
White ink sedimentation is the primary culprit. Unlike coloured inks, white pigment is heavier and naturally settles to the bottom of ink cartridges and circulation lines. When the printer sits idle for even a few days, white particles accumulate in the damper and nozzle passages, which is why consistent ink circulation matters significantly.
Environmental factors play a major role. Low humidity causes inks to dry faster inside nozzles, creating hard deposits that resist standard cleaning cycles. Excessive humidity introduces moisture into ink lines, diluting the ink and affecting flow. Temperature fluctuations also impact ink viscosity, cold thickens inks whilst heat thins them excessively.
Dust and airborne particles represent another overlooked cause. DTF printers draw air through their systems during operation. Without proper filtration, microscopic dust settles on the wiper blade and capping station, eventually making its way into ink lines. Poor maintenance of the wiper blade allows dried ink residue to accumulate and transfer to nozzles during cleaning cycles.
Air bubbles in the ink supply line interrupt ink flow and cause false "low ink" warnings. Bubbles typically form when ink cartridges are installed incorrectly or when the system hasn't been properly primed after maintenance.
How to identify a clogged printhead
The earliest warning sign is a nozzle check pattern showing missing lines or gaps. Run a nozzle check before every production session, a healthy pattern shows solid, unbroken lines of colour, whilst missing segments indicate developing blockages.
Print quality degradation follows. Colours appear dull or patchy, fine details blur or disappear, and designs lack vibrancy. Banding, visible horizontal lines across prints, often indicates partial clogs affecting multiple nozzles in sequence, typically worsening with each successive print.
Strange noises from the printer during cleaning cycles signal trouble. A grinding sound during automatic cleaning suggests the pump is working harder than normal to push ink through partially blocked lines, indicating the need for manual intervention.
How to Perform a Nozzle Check on Your DTF Printer
A nozzle check is the quickest diagnostic tool available. This test prints a pattern designed to reveal which nozzles are firing properly and which are blocked.
Access your printer's menu system and locate the "Nozzle Check" or "Head Check" function. Select this option and allow the printer to complete the full cycle. The resulting printout shows vertical lines of colour corresponding to each nozzle row.
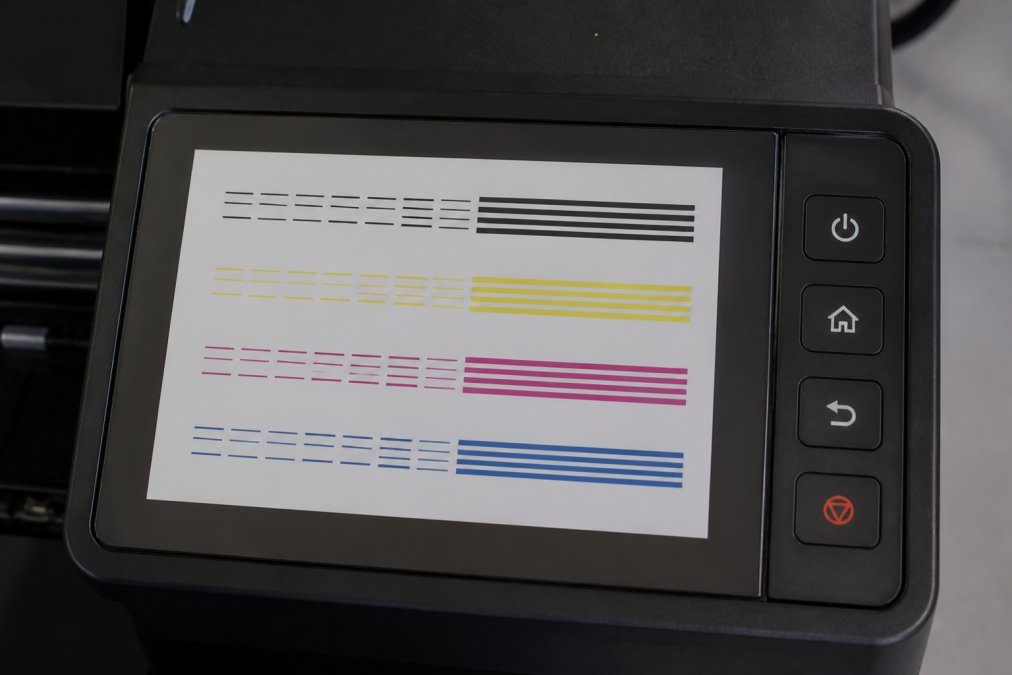
Examine the output carefully. Solid, unbroken lines indicate functioning nozzles. Gaps, missing segments, or faint lines indicate clogs affecting those specific nozzles. A few missing dots at the edges is normal, but significant gaps warrant immediate attention.
If the nozzle check shows blockages, run the printer's automatic cleaning cycle once. Allow this to complete fully, then run another nozzle check. Many minor clogs clear with a single automatic cleaning. If the second check still shows gaps, the blockage has progressed beyond automatic cleaning's capability, and manual cleaning becomes necessary. Attempting multiple automatic cycles wastes ink and can worsen the situation by forcing deposits deeper into nozzle passages.
Document your nozzle check results by photographing them. This creates a baseline for comparison and helps identify patterns.
Manual Cleaning Process for DTF Printhead Clogs
Manual cleaning is more effective than automatic cycles for stubborn blockages, but it requires correct tools and careful technique.
Tools and fluids you'll need
Gather: a cleaning solution specifically formulated for DTF printheads, lint-free cotton swabs, soft-bristled brushes, distilled water, small containers for soaking, protective gloves, and eye protection. The cleaning solution is critical, DTF systems use both water-based and solvent-based inks, so your cleaning fluid must be compatible with both. Always verify that your chosen solution is recommended by your printer manufacturer.
Have distilled water available for final rinses. Tap water contains minerals that leave residue and cause future clogs. Lint-free swabs matter because standard cotton swabs shed fibres that lodge in nozzle passages.
Step-by-step manual cleaning procedure
Step 1: Power down the printer and access the printhead
Switch off the printer completely and allow it to cool for at least 15 minutes. Consult your printer's manual for the exact procedure to access the printhead.
Step 2: Inspect the capping station and wiper blade
Examine the capping station and wiper blade for dried ink accumulation. Use a dry cotton swab to gently remove visible residue. If the capping station has hardened ink, soak it briefly in cleaning solution, then wipe thoroughly.
Step 3: Soak the printhead carefully
Place a small amount of cleaning solution into a shallow container, just enough to submerge the nozzle end of the printhead without covering electrical contacts. Allow it to soak for 15-30 minutes to soften dried ink deposits.
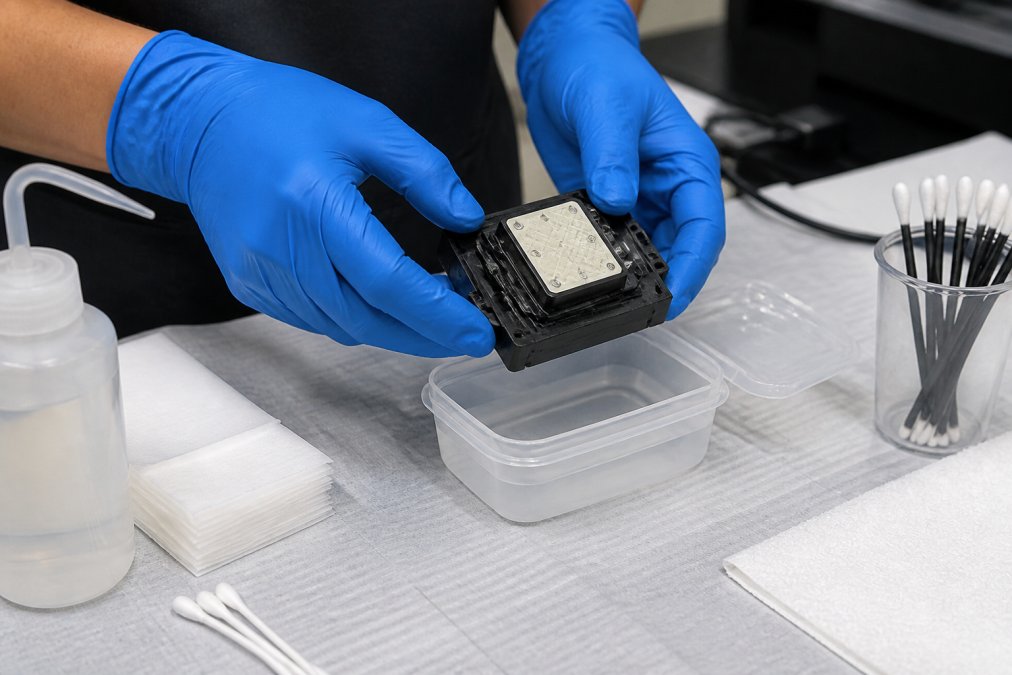
Step 4: Gentle brushing and swabbing
After soaking, use a soft-bristled brush to gently brush the nozzle plate in one direction only, never scrub back and forth. Follow with lint-free swabs dampened in cleaning solution, using fresh swabs until they come away clean.
Step 5: Flush with distilled water
Rinse the nozzle section thoroughly with distilled water to remove all cleaning solution residue. Use fresh swabs for final rinses until they come away completely dry.
Step 6: Air dry completely
Place the printhead nozzle-side up on a clean, lint-free cloth. Allow it to air dry for at least 2 hours before reinstalling.
Step 7: Reinstall and prime
Once fully dry, reinstall the printhead according to your printer's manual. Run the printer's priming cycle to establish proper ink flow before attempting prints.
Step 8: Run a nozzle check
After reinstallation, run another nozzle check to verify that manual cleaning resolved the blockage. If significant gaps remain, the clog may have progressed to the ink lines themselves, requiring professional service.
Preventing White Ink Clogging in DTF Printers
Prevention is substantially more cost-effective than repair. DTF printhead clogs are largely preventable through consistent maintenance and environmental control.
White ink sedimentation and circulation management
Never leave your printer idle for more than three days without running a circulation cycle. Most DTF systems include an automated circulation function that pushes ink through all lines without printing. If your printer lacks automatic circulation, manually trigger a cleaning cycle every 48 hours during extended downtime.
Shake white ink cartridges gently before each production session to redistribute settled pigment. Monitor ink cartridge levels closely and refill when they reach 25% capacity, running cartridges too low starves the system of ink supply and allows air to enter the lines.
Environmental factors affecting ink flow
Maintain your workspace between 18°C and 24°C. Outside this range, ink viscosity changes enough to affect flow characteristics. Humidity should stay between 40% and 60%. Below 40%, inks dry too quickly inside nozzles. Above 60%, moisture enters the system and dilutes inks. In dry climates, use a humidifier near your printer. In humid regions, use a dehumidifier.
Position your printer away from direct sunlight and heat sources. UV exposure degrades inks, and heat fluctuations stress the ink circulation system.
DTF Printer Maintenance Schedule to Avoid Clogs
Structured maintenance prevents most clogging issues before they develop.
Daily and weekly maintenance tasks
Before starting production each day, run a nozzle check. If it shows any gaps, run one automatic cleaning cycle before proceeding with printing.
Clean the wiper blade daily using a dry, lint-free cloth. Check ink levels daily and refill any cartridge below 30% capacity. Weekly, run a full automatic cleaning cycle even if nozzle checks appear normal.
Monthly deep-cleaning protocols
Once monthly, perform a complete manual cleaning of the capping station, focusing on rubber seals and interior surfaces. Inspect all visible ink lines for blockages or discolouration. Every three months, perform a full printhead manual cleaning even if nozzle checks appear normal. Replace the waste ink tank when it reaches capacity.
When to Replace Your Printhead Versus Repair
A printhead typically lasts 1.5 to 3 years with proper maintenance. If your printer is over 2 years old and experiencing recurring clogs despite consistent manual cleaning, replacement may be more cost-effective.
If a nozzle check shows the same nozzles blocked after three separate manual cleaning cycles, the blockage has likely progressed to internal ink channels within the printhead. These internal blockages cannot be cleared manually, and replacement is the only solution.
Physical damage to the printhead, visible cracks, separated components, or bent nozzles, warrants immediate replacement. Compare the cost of a replacement printhead against your typical monthly printing revenue. If replacement costs less than two weeks of lost production, replacement is economical.
Common Mistakes to Avoid When Cleaning Printheads
Never use tap water for rinsing, mineral content leaves deposits that create future clogs. Always use distilled water exclusively.
Avoid using compressed air to force cleaning solution through nozzles. High-pressure air can damage nozzle structures or force blockages deeper into the system. Gentle soaking and manual brushing are far more effective.
Don't mix different cleaning solutions or solvents. Stick with the manufacturer-recommended cleaning solution. Never run more than two consecutive automatic cleaning cycles without checking results. After two cycles, switch to manual cleaning if blockages persist.
Avoid touching the nozzle plate directly with your fingers, skin oils create hydrophobic barriers that repel ink. Don't reinstall the printhead whilst any moisture remains, as even small amounts create air bubbles during operation. Never force the printhead into its housing; if it doesn't seat smoothly, something is misaligned.
DTF printhead clogs are frustrating, but they're largely preventable through consistent maintenance and environmental control. The key is recognising early warning signs through regular nozzle checks and addressing blockages before they progress to internal ink channels.
At BB5wholesale, we understand that printhead issues directly impact your production timelines and profitability. Our 24/7 customer support team can guide you through troubleshooting steps when problems arise, and our gang sheet builder ensures you're producing high-quality transfers efficiently. When your equipment is running smoothly and your designs are optimised, your business thrives. Upload your gang sheet today and experience the difference that reliable DTF solutions bring to your custom apparel business.
Frequently Asked Questions
How do I know if my DTF printhead is clogged?
A clogged DTF printhead shows several telltale signs: streaky or faded prints, missing colours in your output, or visible gaps in the nozzle check pattern. Run a nozzle check print immediately, this diagnostic test reveals which nozzles are blocked. You may also notice ink not flowing properly through the lines or the printer producing weak colour saturation despite fresh ink supplies.
What causes white ink sedimentation in DTF printers?
White ink sedimentation occurs when pigment particles settle at the bottom of the ink tank or lines during periods of inactivity. This is especially common with white ink because its particles are heavier than other colours. Regular circulation through the pump and damper prevents settling. Humidity and temperature fluctuations accelerate sedimentation, so maintain stable environmental conditions between 20-25°C and 40-60% humidity for optimal ink flow.
How often should I perform a nozzle check on my DTF printer?
Perform a nozzle check at least once daily before production runs, and immediately after any cleaning cycle. If you notice print quality issues mid-production, run another nozzle check to catch clogs early. Weekly deep nozzle checks help identify developing problems before they affect output quality. Frequent checks catch partial blockages before they become severe clogs requiring manual intervention.
Can a permanently clogged DTF printhead be repaired, or should I replace it?
Many clogs respond to manual cleaning with proper solvents and ultrasonic cleaning techniques. However, if the nozzle check shows consistent missing nozzles after multiple cleaning attempts, or if you notice physical damage like nozzle deflection or head strikes, replacement is more cost-effective than continued repair attempts. Assess repair versus replacement by comparing cleaning solution and labour time against printhead replacement costs.
This article was written using GrandRanker