


How to Apply UV DTF to Curved Surfaces Without Bubbles

Table of Contents
- Why UV DTF on Curved Surfaces Fails (and How to Fix It)
- Best Tools for UV DTF Application on Curved Items
- Step 1: How to Prepare Surfaces for UV DTF
- Step 2: Align the Transfer Film on the Curve
- Step 3: Apply Pressure from Center to Edges
- Troubleshooting UV DTF Bubbles and Lifting Points
- Temperature, Humidity, and Curing Time
- Removal and Residue Management
- Frequently Asked Questions
Last Updated: September 8, 2026
Why UV DTF on Curved Surfaces Fails (and How to Fix It)
Applying UV DTF to curved surfaces is fundamentally different from pressing a decal onto a flat sheet of acrylic. A curve introduces tension across the film, and when released unevenly, the film lifts, creases, or traps air pockets that ruin the finish.
Most failures trace back to skipping surface preparation, pressing from the edges inward, or rushing in a cold room. The film is flexible but not elastic; it needs to be persuaded into contact gradually with the right tools and sequence.
This guide covers the exact process for curved items like tumblers and bottles, including environmental factors most guides ignore.
Best Tools for UV DTF Application on Curved Items
A successful application requires more than the transfer sheet. You need tools that control pressure precisely and encourage the film to follow the item's radius without stretching.
The essential kit includes a felt squeegee for positioning, a hard plastic squeegee for firm pressure, and low-tack masking tape for alignment. For small-radius items like pens, a rubber brayer roller distributes pressure evenly across the curve, which is difficult with a flat squeegee alone.
3M's guide to pressure-sensitive adhesive application notes that even pressure across the entire adhesive face is the single most important factor in achieving a strong initial bond. A roller is the most reliable way to deliver that on a curved substrate.
The Essential Squeegee and Tape Kit
| Tool | Purpose | Best For |
|---|---|---|
| Felt squeegee | Initial positioning without scratching | Delicate surfaces like acrylic |
| Hard plastic squeegee | Firm pressure to activate adhesive | Glass, stainless steel, ceramic |
| Rubber brayer roller | Even pressure across a radius | Small-diameter items like pens |
| Low-tack masking tape | Temporary alignment hold | All curved applications |
Step 1: How to Prepare Surfaces for UV DTF
Surface preparation is the most skipped step and determines whether your decal stays put. UV DTF adhesive bonds best to a clean, dry, smooth surface; any residue creates a barrier that shows up later as edge lifting.
Clean with isopropyl alcohol at 70% or higher using a lint-free cloth, wiping the entire area. This degreases and removes release agents. Allow the alcohol to evaporate fully; a damp surface prevents proper tack.
For textured surfaces like powder-coated metals or leather, UV DTF is not ideal. It is designed for smooth surfaces like glass, acrylic, stainless steel, and hard plastic. If the substrate has visible texture, the adhesive will not fill the microscopic valleys, leading to poor durability. Test a small corner first.
Step 2: Align the Transfer Film on the Curve
Alignment is where curved surfaces punish impatience. On a flat surface you can reposition easily; on a curve, every peel-back risks stretching the film or contaminating the adhesive.
Peel the backing paper away carefully, keeping the film flat. Do not let the adhesive touch anything but the target surface. Position the decal without contact, using low-tack tape at the top edge as a hinge to keep both hands free.
For a cylindrical item, align the design's centre with the curve's centre. Lower the film from the hinge, making contact at the centre line first, the point of maximum tension, so you can work outward with the film seated where it is most likely to lift.
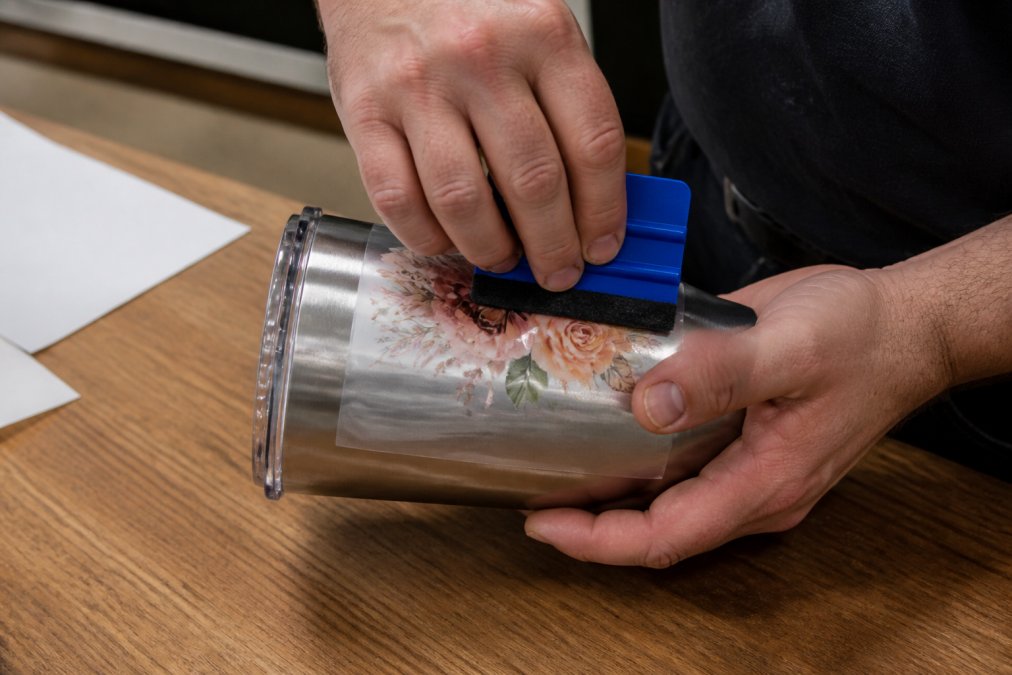
Step 3: Apply Pressure from Center to Edges
With the decal tacked at the centre, move pressure outward toward the edges in a controlled sequence. This is the core of the how to apply UV DTF to curved surfaces process, and where most guides fall short.
Start with the felt squeegee, applying moderate pressure from the centre line outward toward one edge using short, overlapping strokes, which is how to apply UV DTF to curved surfaces without trapping air. This forces air out from under the film. Repeat on the other side until the film is fully seated with no air pockets before switching to the hard squeegee.
Once seated, go over the entire area with the hard plastic squeegee. This activates the adhesive fully and ensures the film follows the radius without gaps. Pay particular attention to the edges, the most common lifting points, and apply firm, direct pressure along every edge.
Troubleshooting UV DTF Bubbles and Lifting Points
Even with careful technique, problems appear. The most common is a small air bubble, usually from dust or a skipped stroke. If caught immediately, work it out with the felt squeegee, pressing from the bubble toward the nearest edge.
If a bubble resists, do not press harder, this stretches the film. Instead, lift the nearest edge back to the bubble, clean the adhesive with fresh low-tack tape, and reapply with the squeegee. This is only practical within the first minute or two before the adhesive sets.
Edge lifting points usually indicate insufficient edge pressure or a surface not fully degreased. If the edge lifts after several hours, the adhesive has cured and cannot be reactivated; the decal must be removed and replaced.
For troubleshooting UV DTF bubbles that appear days after application, the cause is almost always environmental. A decal applied in a cold room or on a cold substrate will not achieve full adhesive tack, and the bond weakens as the item warms and the film expands. This is covered in the next section.
Why the Substrate Material Changes the Failure Mode
The substrate material dictates how the adhesive behaves under stress. On smooth, non-porous glass, the bond relies entirely on molecular attraction. Even a fingerprint's worth of oil prevents proper wet-out, causing a silvering effect, a cloudy patch that is actually separation at the interface. The fix is prevention: a 70% isopropyl alcohol wipe followed by a dry lint-free pass immediately before application.
On powder-coated metal or textured plastic, the adhesive must flow into microscopic valleys to create a mechanical anchor. Below 18°C, the adhesive is too stiff to flow, and the film bridges across valleys, leaving a white haze. Pressing harder will not fix this, the adhesive needs heat. Production shops often warm the substrate to roughly 25°C with a low-setting heat gun before application.
The Pressure Threshold for Different Curved Substrates
Pressure requirements differ by material. On rigid glass and ceramic, firm pressure with a hard squeegee is safe. On thin-walled plastic or acrylic, the same pressure can deform the substrate, causing the film to lift as the material springs back. A rubber brayer roller is safer here because it distributes force across a wider contact patch.
For flexible substrates like silicone or thin PETG, the decal must move with the material. A rigid, fully cured film will crack or delaminate under repeated flexing. Test a small sample and bend it sharply; if it cracks, the transfer is not suitable for that substrate.
When to Abandon the Application
Professional applicators use the "three-strike" limit: if you have lifted and repositioned the decal three times, or tried to work out the same bubble three times, stop. Each lift risks stretching the film and contaminating the adhesive edge. Remove the decal, clean the surface, and start with a fresh transfer.
For troubleshooting UV DTF bubbles that appear days after application, the cause is almost always environmental. A decal applied in a cold room or on a cold substrate will not achieve full adhesive tack, and the bond weakens as the item warms and the film expands. This is covered in the next section.
Temperature, Humidity, and Curing Time
UV DTF adhesive is sensitive to temperature and humidity. Most manufacturers recommend 18°C to 25°C. Below this, the adhesive is stiff and results in poor tack; above this, the film becomes overly soft and prone to stretching.
High humidity can leave a microscopic moisture layer that interferes with adhesion, even after cleaning with isopropyl alcohol. In a damp environment, wipe the surface again immediately before application and work quickly.
Curing time is the final variable. UV DTF transfers reach their full bond strength over several hours, not instantly (sciencedirect.com). The adhesive continues to flow and grip the surface micro-texture during this period. Research on UV-curable adhesive performance under varying humidity confirms that bond strength develops progressively after initial contact. Avoid washing, handling, or exposing the item to temperature swings for at least 24 hours after application to allow the bond to reach full strength.
Removal and Residue Management
Knowing how to remove a UV DTF decal cleanly is as important as applying one. Eventually, a design will need replacing due to wear, rebranding, or a failed application.
UV DTF adhesive is strong, so removal requires patience. Heat is the most effective tool. Use a hairdryer or heat gun on low for 30 to 60 seconds to soften the adhesive, then peel slowly from a corner at a low angle, pulling the film back on itself.
Residue can be removed with isopropyl alcohol or a citrus-based adhesive remover. Apply, let sit for a minute, and wipe with a lint-free cloth. Avoid abrasive pads or metal scrapers. On porous surfaces, some ghosting may remain, a material limitation, not a fault in technique.
Material-Specific Removal Risks
The substrate dictates removal aggression. On borosilicate glass or stainless steel, a medium heat gun and plastic razor blade are safe. On ceramic with a glossy glaze, the same approach is safe, but avoid metallic or reactive glazes, heat can cause crazing that permanently ruins the item.
On acrylic or polycarbonate, heat is a hazard, these thermoplastics soften well below the film's melting point. Skip the heat gun entirely. Use a hairdryer on low or a solvent-based remover applied to the edges with a cotton bud, letting it wick under the film for a few minutes before peeling. This is slower but avoids permanent damage.
On powder-coated metal, the porous coating can absorb adhesive, making removal difficult. Heat is safest, but peel slowly at a very low angle. If the coating lifts with the film, stop, the coating is failing, not the adhesive. Test a hidden area before a full production run.
Long-Term Durability and Removal Timing
Removal difficulty increases with time. Within 24 hours, a decal comes off cleanly; after 72 hours, the adhesive is near full strength and requires more heat and patience. After weeks of UV exposure, the film becomes brittle and prone to tearing. A decal left for six months takes significantly longer to remove than one replaced quarterly.
Dishwasher and UV Exposure Limits
A curved UV DTF wrap will not survive a dishwasher cycle. Standard adhesive is not formulated for high-temperature water and alkaline detergents; a single cycle at 60°C will soften the adhesive and cause edge lifting. For dishwasher-safe items, coat the transfer with a food-safe epoxy or UV-cured topcoat after application.
UV DTF inks are cured with UV light, but the film is not infinitely UV-stable. More than 500 hours of intense direct sunlight will cause yellowing and fading. For indoor items this is rarely an issue; for outdoor signage or vehicle decals, expect replacement within 12 to 18 months. Testing a sample in your environment is the only reliable way to predict lifespan.
For a smooth, bubble-free result on curved items, the process comes down to preparation, patience, and pressure control. BB5wholesale supplies premium UV DTF gang sheets designed for hard surfaces like glass, wood, metal, and acrylic, with strong adhesion and scratch-resistant durability. Each sheet lets you combine multiple designs, so you can test your technique on a small decal before committing to a full production run. BB5wholesale UV DTF Gang Sheet Builder makes it simple to arrange your artwork efficiently.
Frequently Asked Questions
How do you apply UV DTF to curved surfaces without bubbles?
Clean the surface with isopropyl alcohol and let it dry completely. Position the transfer film with tape hinges to control alignment. Apply firm, even pressure with a squeegee from the center of the design toward the edges, pushing air outwards. For tight curves, use a felt squeegee or your thumb wrapped in a microfiber cloth to conform to the shape. Peel the backing film off slowly at a sharp angle.
What tools are essential for applying UV DTF to curved surfaces?
You need isopropyl alcohol and a lint-free cloth for degreasing, a plastic or felt squeegee for pressure application, and low-tack tape to hinge the decal for alignment. A heat gun or hairdryer helps the flexible film conform to sharp curves. For small items like cups, a craft knife and tweezers assist with precise positioning. A soft microfiber cloth protects the surface during pressure application.
Do I need to heat the surface before applying UV DTF?
Heating the surface is not mandatory, but it helps on sharp curves or in cold environments below 15°C. Warm the substrate gently with a heat gun to around 30-40°C to increase the tack of the adhesive and make the film more pliable. Avoid overheating, which can cause the adhesive to cure prematurely and reduce bond strength. Always test on a small area first.
Can UV DTF stickers be repositioned once applied to a curved surface?
No, UV DTF stickers are not repositionable. Once the adhesive touches the substrate, it forms a strong bond immediately. To avoid mistakes, use low-tack tape to hinge the transfer film and check alignment before pressing the decal down. Lift the entire transfer film and re-hinge it if the position is off. Do not attempt to peel a corner of the sticker itself, as this will stretch the film.